متن ها در بوت استرپ

آموزش متن ها در بوت استرپ
با سلام و احترام به شما همراهان همیشگی
با قسمت دوم آموزش متن ها در بوت استرپ در خدمتتون هستیم. در صورت مشاهده نکردن قسمت اول آموزش بوت استرپ4 کلیک کنید.
بوت استرپ 4 دارای چندین کلاس متفاوت برای متن ها می باشد. با این کلاس ها شما به راحتی می توانید متن هایی با رنگ های مختلف و استاندارد برای صفحات وب سایتتان ایجاد نمایید.
کلاس هایی که برای تغییر رنگ در بوت استرپ استفاده می شوند:
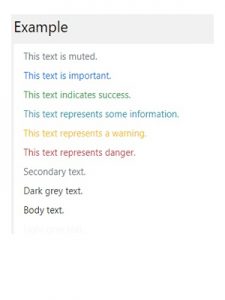
.text-muted, .text-primary, .text-success, .text-info, .text-warning, .text-danger, .text-secondary, .text-white, .text-dark, .text-body (default body color/often black) and .text-light
 <p class="text-muted">This text is muted.</p>
 <p class="text-primary">This text is important.</p>
 <p class="text-success">This text indicates success.</p>
 <p class="text-info">This text represents some information.</p>
 <p class="text-warning">This text represents a warning.</p
 <p class="text-danger">This text represents danger.</p>
 <p class="text-secondary">Secondary text.</p>
 <p class="text-dark">This text is dark grey.</p>
 <p class="text-body">Default body color (often black).</p>
 <p class="text-light">This text is light grey (on white background).</p>
 <p class="text-white">This text is white (on white background).</p>
هم چنین می توانیم متن ها را به صورت anchor (لینک) بنویسیم:
<div class="container">

  <h2>Contextual Link Colors</h2>

  <p>Hover over the links.</p>

  <a href="#" class="text-muted">Muted link.</a>

  <a href="#" class="text-primary">Primary link.</a>

  <a href="#" class="text-success">Success link.</a>

</div>
برای دادن ضخامت های مختلف به متن می توانیم از این کلاس ها استفاده کنیم:
<div class="container">

  <h1>Font weight and italics</h1>

  <p class="font-weight-bold">Bold text.</p>

  <p class="font-weight-bolder">Bolder text.</p>

  <p class="font-weight-normal">Normal weight text.</p>

  <p class="font-weight-light">Light weight text.</p>

  <p class="font-weight-lighter">Lighter weight text.</p>

  <p class="font-italic">Italic text.</p>

</div>
ادامهی آموزش فقط برای اعضاء سایت نمایش داده میشود
[member]
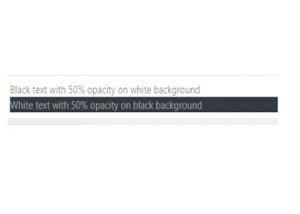
برای تنظیم شفافیت و درجه غلظت متن های سیاه و سفید می توانیم از کلاس های زیر استفاده کنیم:
<p class="text-black-50">Black text with 50% opacity on white background</p>

  <p class="text-white-50 bg-dark">White text with 50% opacity on black background</p>
بک گراند کالر برای متن ها
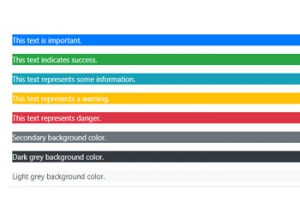
برای بک گراند دادن به متن ها از کلاس های زیر استفاده می کنیم:
<div class="container">

  <h2>Contextual Backgrounds</h2>

  <p>Use the contextual background classes to provide "meaning through colors".</p>

  <p>Note that you can also add a .text-* class if you want a different text color:</p>

  <p class="bg-primary text-white">This text is important.</p>

  <p class="bg-success text-white">This text indicates success.</p>

  <p class="bg-info text-white">This text represents some information.</p>

  <p class="bg-warning text-white">This text represents a warning.</p>

  <p class="bg-danger text-white">This text represents danger.</p>

  <p class="bg-secondary text-white">Secondary background color.</p>

  <p class="bg-dark text-white">Dark grey background color.</p>

  <p class="bg-light text-dark">Light grey background color.</p>

</div>
می توانید با اضافه کردن کلاس های زیر به تگ های HTML ویژگی های بصری متفاوتی را ایجاد نمایید:
کلاس .font-weight-bold یرای بلد کردن متن
کلاس .font-italic برای مورب نوشتن متن ها
کلاس .small برای کوچک تر تایپ کردن متن نسبت به بقیه متن های صفحه
کلاس .text-left برای چپ چین کردن متن ها در صفحه
کلاس .text-center برای وسط چین کردن نوشته ها در صفحه به کار می رود
کلاس .text-lowercase برای تبدیل کردن متن های صفحه به حروف کوچک
کلاس .text-uppercase برای تبدیل کردن متن های صفحه به حروف بزرگ
[/member]


دیدگاهتان را بنویسید
برای نوشتن دیدگاه باید وارد بشوید.